- Previous blog
- Next blog
- Huyett Marketing Department
- 11/11/2021
- Updated 11/09/2023
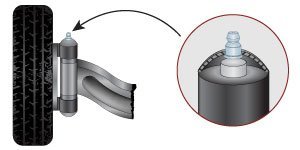
Grease fittings, also known as zerk fittings and grease zerks, are an essential component of many machines. They allow operators and engineers to easily add grease to internal moving parts with a grease gun, providing lubrication that extends the machine’s life and keeps it working smoothly.
This article explains how to install various types of grease fittings, including threaded, self-tapping, and drive-type grease fittings.
What is a Grease Fitting?
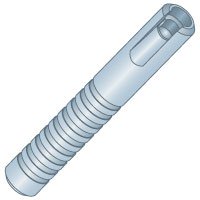
Grease fittings (zerk fittings/grease zerks) are fasteners that are screwed or driven into a machining component that needs lubrication to operate. They regulate the pressure and flow of the grease as it is forced into the zerk fitting and keep the grease from leaking out.
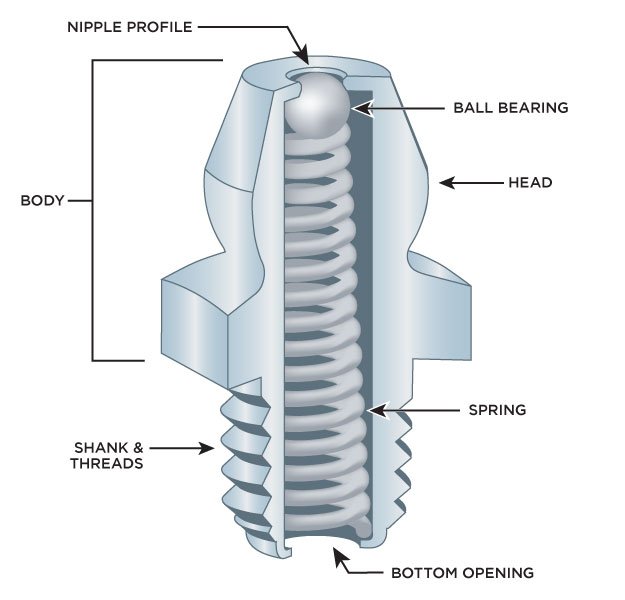
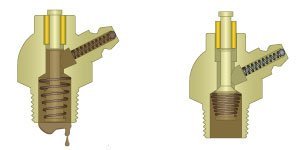
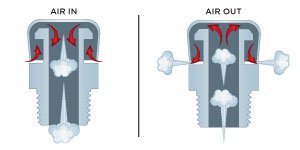
Regardless of the type of zerk fitting, they all have a shank with open ends and a hollow body that houses a spring attached to a top component, which is typically a ball bearing but can also be a plunger or other type of stopper. That ball bearing keeps the top open end sealed until it is compressed down by grease forced into the fitting from a grease gun. The bottom remains open and allows the grease to flow into the application.
The methods used to install a grease zerk depend on the type of shank it has, which can be threaded, serrated, or flush.
Types of Grease Fittings
All grease zerks provide an opening to inject grease and other lubricants into a mechanism. However, their design differs depending on their intended location and the type, pressure, and frequency of lubrication.
Standard
grease zerk fittings are the most versatile and widely used. They provide a secure connection for grease guns and are available in many variants to suit specific use cases.
grease zerk fittings are the most versatile and widely used. They provide a secure connection for grease guns and are available in many variants to suit specific use cases.
Button head grease fittings have a higher flow rate suitable for large volumes of grease. They are often used in heavy-duty applications where durability is a priority, including in agriculture and mining.
Pin-type grease fittings feature a cross pin which, when used with a pin-type grease gun coupler, creates a high-pressure leak-proof seal between the grease gun and the fitting.
Flush grease fittings feature a low-profile head ideal for locations with minimal clearance, including moving parts such as shafts and pulleys.
Flow-stop grease fittings incorporate a pressure valve that closes once the lubricant pressure reaches a minimum level. They prevent over-greasing, which can damage machinery and seals.
Breather fittings allow air to flow into transmissions and differentials to maintain atmospheric pressure while preventing debris from entering the mechanism.
Rivet-type fittings are typically used on king pins because the flush shank design does not interfere with underlying moving parts. Rivet type fittings use
standard couplers.
standard couplers.
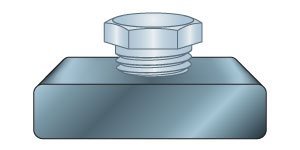
Hex head pipe plugs are not grease zerks; they are plugs to cover a hole where grease zerks are no longer necessary.
Installing Grease Fittings: Threaded/Self-Tapping and Drive-Type
Grease zerks should be straightforward to install and durable enough to remain reliable in challenging conditions. There are three basic grease zerk installation methods and a wide variety of designs that use each method.
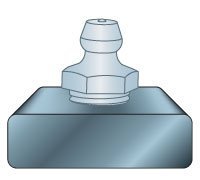
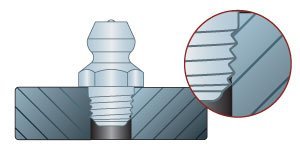
Threaded/self-tapping grease fittings feature a threaded shank that is screwed onto an internal matching thread in a hole on the machine’s body. Self-tapping grease zerks have hardened threads so they can be installed in untapped holes.
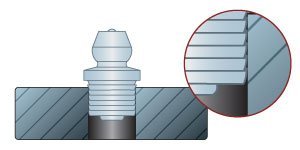
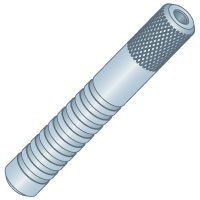
Drive-type grease fittings have a serrated shank that is driven into an untapped hole.
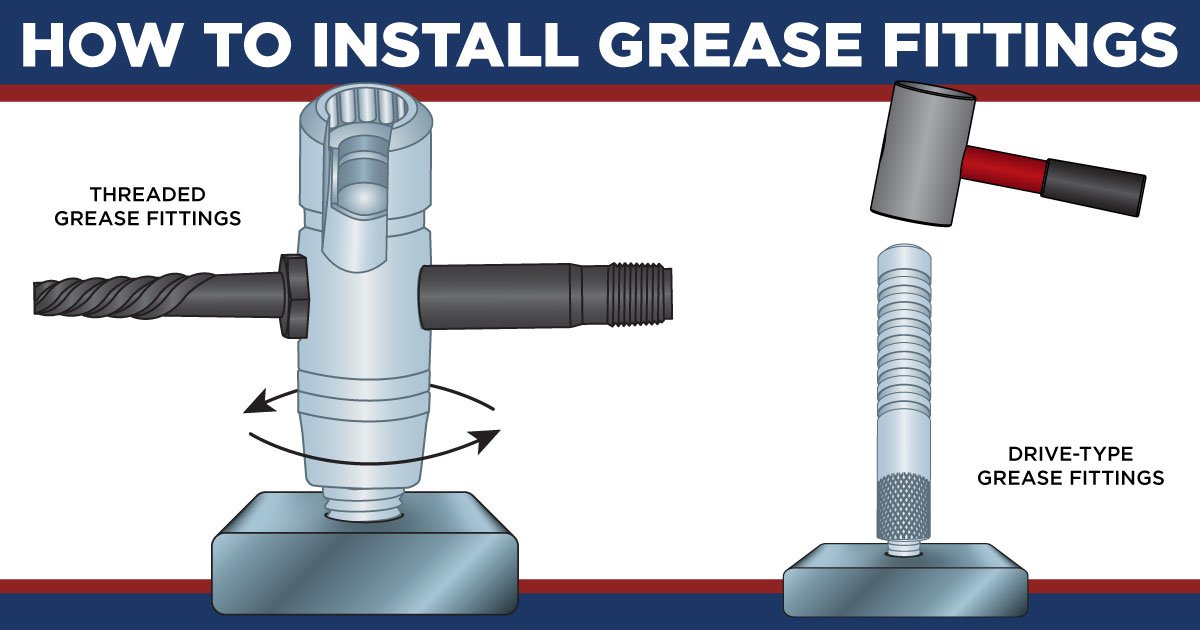
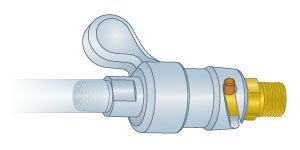
How to Install Threaded Grease Fittings
Threaded grease zerks are for use with threaded holes, and have four primary functional components:
- The nipple, which is connected to the grease gun coupler during greasing.
- A ball-check valve, which stops grease from flowing back out of the fitting while preventing dirt and debris from contaminating the assembly.
- A hex hold, which allows the grease zerk to be installed with a suitably sized wrench.
- A threaded shank, which is attached to an internally threaded mating hole.
Before installing threaded zerks, ensure the shank threads match the threads in the hole. Zerks use pipe threads designed to create a tight seal. There are many different types of pipe thread, which differ by:
- Thread series
- Major and minor diameter
- Thread pitch
- Shank taper
- Shank length
Read our
Guide to Grease Fitting Threads to learn more about pipe threads and pipe thread standards.
Guide to Grease Fitting Threads to learn more about pipe threads and pipe thread standards.
Once you understand the type of thread on the mating hole, you can verify a zerk’s dimensions with a thread checker or order fittings with the correct thread.
To install a threaded grease fitting:
- Clean the shank and the mating hole to remove dust and debris.
- Place the fitting into the hole, ensuring it is perpendicular to the surrounding material.
- Tighten the fitting as far as possible by hand.
- Use an open-end wrench or grease fitting multi-tool to tighten the fitting further. Half-a-turn beyond hand-tight should be sufficient, although the correct torque differs depending on the fitting and the application. The bottom of the hex area should be in contact with the material around the mating hole. Excessive torque will break the zerk or strip the threads of the mating hole, so be careful to avoid over-tightening.
- Test the fitting by applying grease with a grease gun. Verify that no grease leaks between the hole and the hex area. If it does, tighten and try again.
How to Install Self-Tapping Grease Fittings
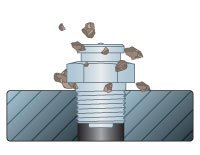
Self-tapping grease fittings are threaded fittings with hardened threads. Because the threads are hardened, they can be screwed into untapped holes. The material in the hole deforms around the threads, creating a leak-proof seal.
Self-tapping grease zerks can be used in many applications, but they should not be used with heat-treated, hardened parts.
The installation process for self-tapping zerks is almost identical to threaded grease fittings.
- Select a self-tapping zerk with a thread diameter slightly larger than the hole.
- Insert the fitting, ensuring it is perpendicular to the part.
- Hand tighten the fitting.
- Use a zerk grease fitting multi-tool to complete the installation.
- Ensure the bottom of the hex is in contact with the part, and test by greasing as normal.
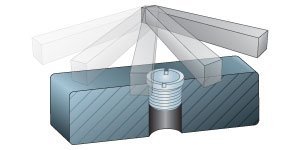
How to Install Drive-Type Grease Fittings
Drive-type grease fittings are used when it is impractical or inefficient to use threaded fittings. Instead of a threaded shank, drive-type fittings have a serrated shank. When the fitting is driven into a drilled hole, the serrations deform to create a secure connection.
Drive-type fittings are faster to install because they don’t require a threaded hole, making them ideal for high-volume production and maintenance scenarios. Although they create a secure attachment, drive-type fittings are not recommended for high-pressure lubrication systems.
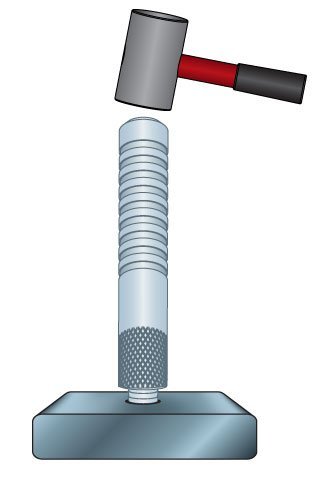
To install a drive-type fitting, you will need a hammer and a grease-fitting drive tool. The drive tool fits over the grease zerk, connecting with a shoulder above the shank. The fitting is driven into the hole by tapping the drive tool with the hammer.
Some installers use a wrench socket instead of a drive tool, but we recommend using a correctly sized drive tool to avoid damage to the fitting and the wrench socket.
- Select an appropriately sized drive-type zerk.
- Clean the hole and the zerk.
- Put the drive tool over the top of the fitting.
- Insert the fitting in the hole, ensuring it is perpendicular to the component.
- Tap the drive tool with the hammer to drive the fitting into the hole until it is fully seated against the part.
- Test the seal by greasing as usual with a grease gun.
Tools for Installing Grease Fittings
There are a few different grease zerk tools that aid the installation process. Which one you choose will depend on whether you are using a threaded or drive-type zerk.
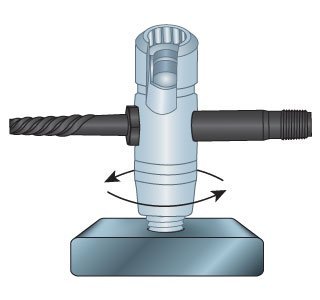
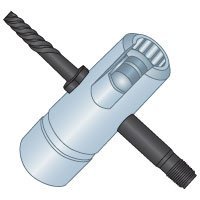
Grease Fitting Multi-Tool
This is a small hand tool that is used both to install threaded zerk fittings and to replace broken fittings. It has four functionalities:
- The angled, thick hex section attaches to angled zerks for threaded installation.
- The straight, thick hex section attaches to straight zerks for threaded installation.
- The short external threaded section with straight threads is used to clean and re-tap holes when replacing zerks.
- The long external threaded section with slanted threads removes broken grease zerks.
Grease Fitting Drive Tool
Drive fitting tools are more simple and do not need to be able to re-tap or clean a hole. These tools fit over the top of a drive-type zerk and are hit with a rubber mallet to drive the zerk into place.
Drive tools come in both straight and angled styles to accommodate different zerk shapes.
How to Maintain Grease Fittings
Grease fittings are rugged components, but they can be blocked if they are not appropriately maintained.
To keep zerks in good working order:
- Use high-quality grease to limit grease separation.
- Follow the recommended lubrication schedule for the part. Inadequate lubrication can allow dirt and other contaminants to enter the lubrication system.
- Use
grease fitting caps to prevent contamination from dust, debris, and moisture. - Clean zerks before lubrication. While the part is dirty, greasing may force debris into the fitting, preventing the valve from operating correctly.
If a grease fitting is blocked, you may be able to unblock it with a
grease fitting unblocker, also known as Zerk fitting cleaning tool. Unblockers inject light-weight oil into the fitting under pressure, loosening seized parts. Grease fittings that cannot be unblocked should be replaced as soon as possible.
grease fitting unblocker, also known as Zerk fitting cleaning tool. Unblockers inject light-weight oil into the fitting under pressure, loosening seized parts. Grease fittings that cannot be unblocked should be replaced as soon as possible.
Grease Fitting Craftsmanship
High-quality grease fittings must meet or exceed certain performance expectations in order to withstand their application environments, which introduce extreme temperature fluctuations, pressure, and chemical lubricants. Many of them must also conform to technical DIN and SAE specifications that regulate design, performance, and threads.
Regardless of the formal requirements, grease fittings of such quality will undergo similar manufacturing processes and tests to ensure optimal performance.
Case Hardening
Many grease fittings are case hardened in furnaces with complete atmospheric control. This eliminates scaling and ensures control of case depth. Heated to red hot, the material absorbs carbon, making it harder. The heated fitting is then dropped in oil to cool and re‑heated to scale back hardness to desired specification.

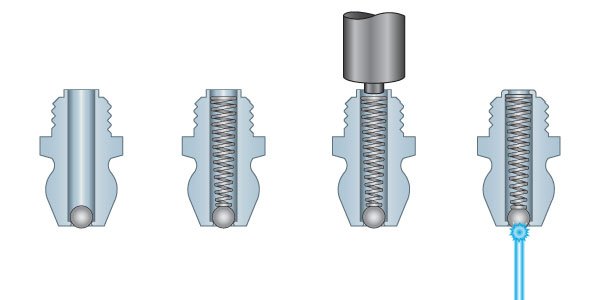
Assembly
The assembly process is important to control to ensure quality craftsmanship. In many cases, the ball check is inserted into the hollow zerk shaft, followed by the spring. Then the lip is formed to hold components in place. From here, the entire fitting moves into the testing process. Automated assembly allows for more precise control of the process.
Testing
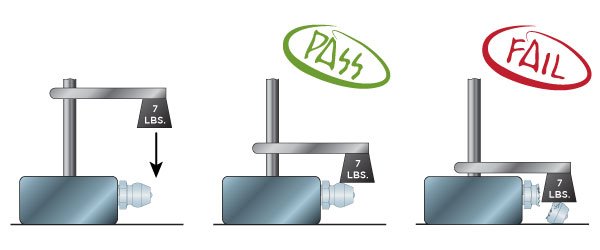
Zerks are usually subjected to an impact test, which simulates the stress fittings may encounter in the field. The test ensures that the nipple possess adequate strength and hardness. As an example test, a weight may be dropped in free fall against the fitting. If there is no damage, the fitting would pass inspection. If damage occurs, it does not pass.
Performance Testing
Before the fitting leaves the manufacturer, it’s likely that it will undergo several performance tests. These may include:
- Opening Pressure Test:
Ensures the ball check and spring will operate properly - Back Pressure Test:
Ensures the ball check will remain seated and that the fitting will not allow excessive leakage as pressure accumulates - Operating Pressure Test:
Determines the maximum operating pressures that the fitting can withstand without damage to the spring, ball, and fitting body

To learn more,
call our expert Sales Team or browse our full range of
lubrication fittings and accessories.
call our expert Sales Team or browse our full range of
lubrication fittings and accessories.