You’ve heard me say more than once in my videos, making your own guide rails is easy.
With a little direction and guidance, anyone can make and attach their own guide rails to a table saw or band saw and enjoy a major upgrade.
You don’t need to be a welder or a machinist or even an experienced woodworker to make your own guide rails, you just need a few basic tools.
Not only have I made several guide rails for myself and others, I have helped hundreds of people with their guide rail projects as well. I like helping people improve their machines, their productivity, and become happier woodworkers. In fact, quite a few people at this point consider me their Personal Guide Rail Consultant. 😉
Below is a simple checklist I compiled detailing all of the tools and materials you will need if you decide to make your own guide rails.

with step-by-step written instructions, photos, materials and tools checklist, and links to free videos.
AskWoodMan’s DIY Guide Rails Checklist
MATERIALS
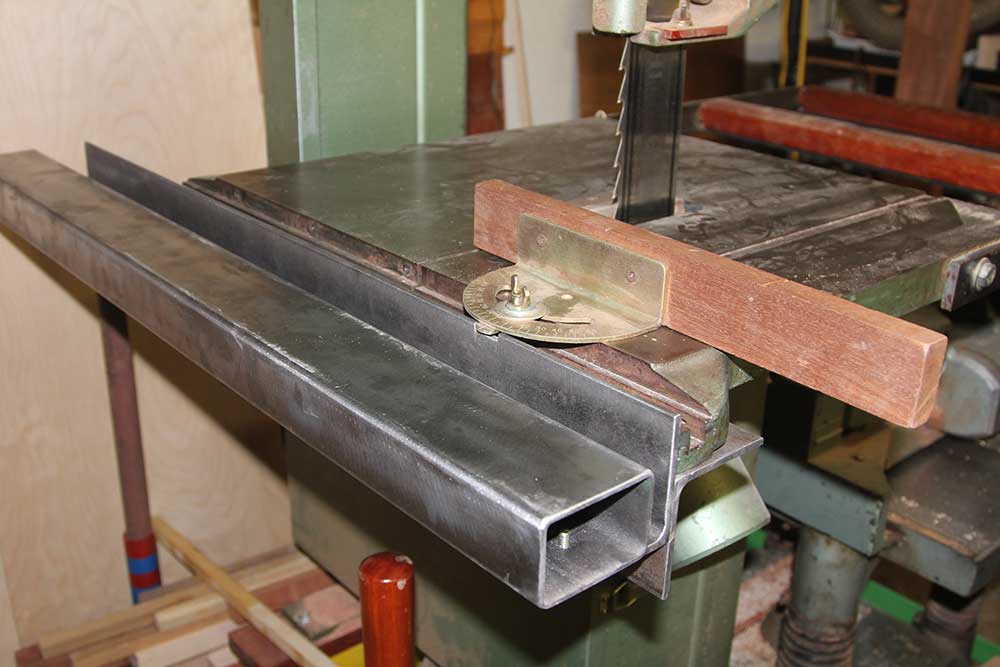
- Angle iron, 3″x3″x1/4” – Length should match the length of your table saw plus extension table.(NOTE: Many commercial guide rails are made using 3″x2″ angle iron, but it’s much nicer to have a 3 inch ledge for more room and a more secure fit.)
- Rectangular tubing, 3” x 2” 11 gauge – Length should be slightly longer than your angle iron, 6 – 12 inches longer works fine. For example the tubing for my table saw guide rails is 7 feet long and the angle iron measures 6 feet 4 inches.
NOTE: Many commercial guide rails are made with only 1/16” wall thickness. We like 11 gauge (a fraction under 1/8” or .12 inches) for added rigidity but also because it give you a better thread connection (thickness) for your tapped holes coming in from the bottom. - Bolts washers, and lock washers – To attach the tubing to the angle iron I used 1/4″-20TPI, grade 8, cap head screws, 3/4″ long, each with washer and lock washer.
NOTE: Hex bolts would work just as well. How many you need with depend on your spacing. For my project I ended up using 9 bolts.
- Bolts, washers, lock washers and nuts – To attach the angle iron to the saw I used 5/16″ counter sunk, grade 8, 1.25″ long flat head, allen key bolts. You will also need washers, lock washers and nuts for each. (You could also use 1/4” bolts.) – How many you need will depend on your table saw and your access around the cast iron webbing.
- High quality primer and paint – Use quality primer and paint if you aren’t sending your steel out to get powder coated. In my AskWoodMan video series I used Sherman Williams Kem Kromik Unversal Metal Primer and Sherman Williams Sher-Kem Alkyd Enamel Paint.
- Adhesive backed measuring tape – We sell a high quality Starrett SAE/Metric measuring tape, left to right, 6 foot with self-adhesive. There is also a short video showing how to easily apply the tape to the tubing to make sure it’s in perfect position.
- Spacers – You’ll need spacers for two different spacing set ups. For the parallel spacing set-up you’ll need a 3/4″ or thicker parallel bar (or blocks), and a couple more spacers for lift. For the step-down spacing set up you’ll need two long, flat, straight, milled boards (36 -48″ in length) and two small blocks of wood exactly 13/16″ in height.
TOOLS
- Drill press
- Drill bits – A #7 and a 5/16″ – If you don’t have a #7, you can use also use a 13/64″ drill bit. (#7 = .201 inches vs. 13/64″ = .203 inches)
- 1/4” 20TPI tap – I like HSS (high speed steel) vs carbon steel. They cost a little more but they cut better, they last longer and are much less prone to breaking.
- Countersink (U.S.) – I like to use a 3/4″ diameter single flute HSS 82 degree countersink with 1/2″ shank.
- Tap – For tapping you can use a spring loaded tapping center, tap wrench, manual hand tapper or even a pair of vise grips.
- Measuring and marking tools – Combination square, scribe, punch, rulers, tape measure, etc…
- Angle grinder – This is used for descaling, deburring, cleaning and softening the sharp edges of the metal. It can also be used for cutting the angle iron and tubing to length with a cutoff wheel.
- Clamps – You’ll need an assortment of clamps for your two crucial spacing set ups. Clamps will hold the angle iron and tubing in proper relation while you mark for position. (I think Bessey Rapid action clamps are the best!) Visit our companion blog article for more info and pictures.
- Jigsaw / Hacksaw – For cutting our your miter notch.
- Sandpaper / Files – For smoothing and softening the miter notch sharp edges.
- Painting Supplies – I use a synthetic nap roller to apply the primer and a foam roller to apply the enamel.